Connect from iMac to Debian to run Giocoso
The point here is: iMac wants to effectively ssh to a Debian PC to run Giocoso. But if the network is clobbered for any reason, Giocoso shouldn't just die: it needs to persist regardless of the state of the iMac↔Debian connection.
On the playing (Linux) PC:
sudo apt install dtach
Dtach is a session manager or detachable process wrapper. It provides the same sort of “detach” and “reattach” to session features of a multiplexer such as screen or tmux, but without doing those programs' “terminal emulation” job that can sometimes mess up graphical display components (such as Giocoso's album art display).
Once the Debian PC has dtach installed, create this AppleScript on the iMac:
tell application "iTerm"
set newWindow to (create window with default profile)
delay 0.5
tell current session of newWindow
	write text "ssh -t hjr@langlais \"rm -f /tmp/giocoso_socket; dtach -A /tmp/giocoso_socket -z /usr/bin/giocoso3.sh\""
end tell
end tell
That says to open iTerm, ssh to the Debian box (mine's called “langlais” and my username here is “hjr”). It then says, “when you're connected, wait half a second for things to settle down, then use dtach to start a new session and within that session, run Giocoso”. If the network dies between the iMac and the Debian box, the session persists… and the music keeps playing!
Save the AppleScript into the Applications folder as an application (not as a script, script bundle or text file). You can right-click the saved application icon in Finder and use 'Get Info' to display the script's details and then copy/paste in an appropriate image for the 'application icon'.
Create a Program Launcher for Giocoso, Accessing Music Player Remotely
The Script Editor allows you to create Apple Scripts. Click New Document and paste this lot in:
do shell script "/opt/local/bin/bash -c '/opt/local/bin/wezterm -e ssh -Y -t hjr@frank \"tmux new-session -A -s giocoso \"/usr/bin/giocoso3.sh\"\"'"
File → Save and then give it a name, save in the Applications folder, and be sure to select File Format = Application.
Note that that's the version for Macports on older versions of macOS. On the latest, greatest Tahoe, the path to wezterm and bash (having been installed by Homebrew) are different. The command there would be:
do shell script "/opt/homebrew/bin/bash -c '/opt/homebrew/bin/wezterm -e ssh -Y -t hjr@frank \"tmux new-session -A -s giocoso \"/usr/bin/giocoso3.sh\"\"'"
In either case, the script says “launch Wezterm terminal then ssh to my music player PC and use tmux to create an uninterruptible session in which Giocoso will run”.
If you wanted to run the program locally, you'd simply do:
set myCommand to "/opt/homebrew/bin/bash -l -c /usr/local/bin/giocoso3.sh"

-- Calling the binary with just the command arguments skips the 'default' window logic
do shell script "/opt/homebrew/bin/wezterm start -- " & myCommand & " > /dev/null 2>&1 &"

delay 0.5 -- Give it a heartbeat to spawn
tell application "WezTerm" to activate
Replace mention of “giocoso3.sh” with, for example, “semplice2.sh” to get other bits of my software running locally, too.
To assign the new application a program icon, right-click its icon in Applications, select Get Info. Drag the required program icon to the top-left of the resulting panel:
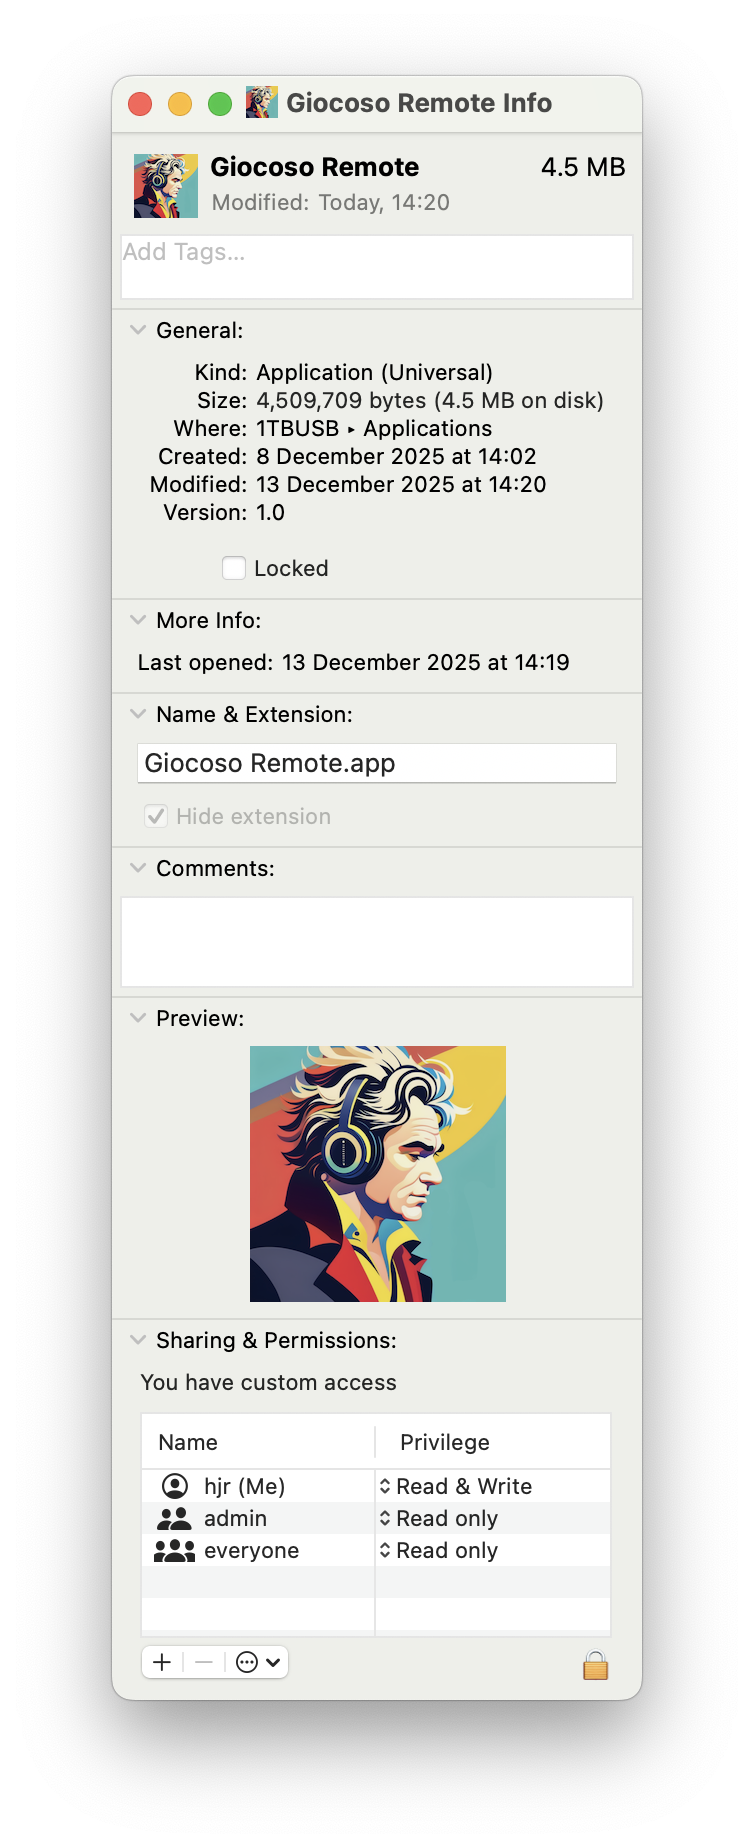
Get the little icon correct in the top-left corner and the big icon in the lower part of the panel will come right, too. Once it is, close the panel and the launcher in Applications will look correct, too.
Configure Wezterm Terminal to look nice
Wezterm Terminal can be installed with Homebrew or MacPorts:
brew install wezterm
…or…
sudo port install wezterm
WezTerm will tend to want open by default using a small window with small fonts: I suggest you would want to change that up a bit. The way you do that is to issue these commands:
cd
nano .wezterm.lua
Paste into the new file the following:
local wezterm = require 'wezterm'
local config = wezterm.config_builder()
config.initial_cols = 103
config.initial_rows = 28
config.color_scheme = 'BlueBerryPie'
--config.color_scheme = 'Tokyo Night Light (Gogh)'
--config.color_scheme = 'Tokyo Night Storm'
--config.color_scheme = 'Hopscotch'
--config.color_scheme = 'Ic Green Ppl (Gogh)'
--config.color_scheme = 'Ic Orange Ppl (Gogh)'

config.font = wezterm.font("Inconsolata", {weight="Regular", stretch="Normal", style="Normal"})
config.font_size = 16

return config
Save the modified file. Hopefully, most of this is self-explanatory: it tells WezTerm to open at an initial 103 columns by 28 rows; to use a specific font at 16pt size. Notice how you comment lines out in this file: two dashes, not the '#' you might be familiar with from other scripting languages. The above also mentions a number of built-in colour schemes, with “BlueBerryPie” being uncommented and thus the active scheme. You'll have to experiment as you wish! Other colour schemes (lots of them!) are available: you don't need to download them, just paste in a “config.color_scheme = xxxxx” line into the file in the appropriate place.
Note that if you have alternative fonts available, simply swap their name (eg, “Luxi Mono” for “Courier New” in the above script, leaving everything else the same. You can, of course, have multiple “config.font” lines in the same file, with all bar one of them commented out, so you can also experiment with different choices of font as the mood takes you.
Some Apps
Firefox can be downloaded with Safari! Visit their website and download it directly. Vivaldi is much faster, however: visit their website, download and install in the usual fashion.
Commander One is a good file manager: direct download from their website. On the other hand, it pays to learn to set up Finder's left-hand navigation pane correctly (with placeholders for your home folder, etc) and then Finder is plausibly usable.
Nice text editor: Geany, also directly-downloadable from their website. I also like CotEditor.
Rectangle for Windows snapping (Monterey doesn't do it natively, I think: I even install it on to Tahoe, however, because I think it's better than the native windows snapping [which you have to disable when prompted]).
Virt-Manager is installable via Macports and/or Homebrew (See, for example, this article). Looks revolting, with terrible screen resolution and fuzzy appearance, but it works sufficiently, though GUI connections to the guest desktop will fail frequently (but can be restarted as necessary). Note that I've always found Virt-Manager an awkward tool to use and have thus recently given up trying to do KVM on a Linux server altogether. These days, I use Proxmox for all my Intel CPU virtualisation requirements and interface with it via a standard browser on my physical PC: the looks and resolution are perfectly fine in that environment.
UTM is installable for free and is a nice virtual machine hypervisor, in the same way as VirtualBox is (but without coming from the House of Oracle). Works nicely for Windows and Linux VMs and, on the lastest M4 iMacs, it will virtualise macOS environments too. One word of warning: if you're virtualising macOS in UTM, you may well find that terminals like Kitty and WezTerm won't launch because they depend on an accelerated graphics processor -and UTM doesn't pass through your physical PC's graphics hardware. I've found, however, that iTerm2 can be installed (e.g., brew install iterm2) and will run successfully and it can display sixel graphics correctly, so Giocoso displays album art perfectly fine in it. Note that UTM doesn't do snapshots of VMs. Tools that claim to provide a wrapper around qemu to do this rely on finding qemu in a Homebrew-specific location, so won't work if you're using Macports… 
CrystalFetch ISO Downloader works with UTM in a synergistic manner to enable the easy downloading and creation of Windows 10 and 11 ISOs.
PDFGear is a free PDF viewer and editor. Handy for adding individual PNGs or JPGs to the official PDF booklets of a CD.
Homebrew
First install the tools needed to compile new software:
xcode-select --install
After that, follow the instructions at their website.
Once installed:
echo >> /Users/hjr/.zprofile
echo 'eval "$(/usr/local/bin/brew shellenv)"' >> /Users/hjr/.zprofile
eval "$(/usr/local/bin/brew shellenv)"
These commands are shown to you at the end of the installation anyway, so just do them as provided: the “hjr” bit of the above is obviously specific to me!
To get Giocoso installation script downloaded, you're going to need the wget utility and a modern version of Bash, so my suggestion for your first test of Homebrew is to issue the command:
brew install wget bash
It will take an age to compile. Just be patient…
Installing Macports
The alternative to Homebrew for installing new packages on macOS is Macports, which has the advantage over Homebrew of running on older macOS versions (Homebrew won't support installing things on Monterey, for example, though it will still work for the most part: there's just no support for getting it to work).
Do not use both Macports and Homebrew: it's one or the other, but never both at the same time. All hell lets loose when you mix your package managers!
To install Macports:
First install the software compiler toolchain:
xcode-select --install
After that, download the appropriate package for your version of macOS:
https://github.com/macports/macports-base/releases/download/v2.11.6/MacPorts-2.11.6-26-Tahoe.pkg
https://github.com/macports/macports-base/releases/download/v2.11.6/MacPorts-2.11.6-15-Sequoia.pkg
https://github.com/macports/macports-base/releases/download/v2.11.6/MacPorts-2.11.6-14-Sonoma.pkg
https://github.com/macports/macports-base/releases/download/v2.11.6/MacPorts-2.11.6-13-Ventura.pkg
https://github.com/macports/macports-base/releases/download/v2.11.6/MacPorts-2.11.6-12-Monterey.pkg
https://github.com/macports/macports-base/releases/download/v2.11.6/MacPorts-2.11.6-11-BigSur.pkg
https://github.com/macports/macports-base/releases/download/v2.11.6/MacPorts-2.11.6-10.15-Catalina.pkg
https://github.com/macports/macports-base/releases/download/v2.11.6/MacPorts-2.11.6-10.14-Mojave.pkg
https://github.com/macports/macports-base/releases/download/v2.11.6/MacPorts-2.11.6-10.13-HighSierra.pkg
https://github.com/macports/macports-base/releases/download/v2.11.6/MacPorts-2.11.6-10.12-Sierra.pkg
These URLs are obviously version-dependent and the versions shown are only correct at the time of writing (December 2025). Check the Macports website for the actual versions current at the time you want to install. There are versions available for macOS releases earlier than Sierra, but installing Giocoso on such ancient operating systems is definitely not supported at all, so be my guest but you're on your own for them!
You will need wget and a modern version of Bash to be installed before you can obtain the Giocoso installer:
sudo port install wget bash
After that, wget software.bbritten.com/gioinst.
NFS Mounts
They work much as in Linux, but with one key extra mount option required:
192.168.137.1:/music /opt/nfs/music nfs rw,noowners,nolock,**resvport**,bg,hard,intr,tcp,rsize=65536,wsize=65536,readahead=128,noatime,actimeo=30 0 0
The “resvport” option is essential to get an NFS mount working on macOS properly.
Note that I am used to setting much larger rsizes and wsizes on Linux boxes doing NFS mounts, but I am led to believe that macOS gets a bit upset with huge settings for those options and that 65536 is the “correct” size for these things in this environment (see multiple online sources and forums ad nauseum!)
Giocoso Playback Issues
There is no ability to pause play in Giocoso on macOS. Pausing the ffmpeg process doesn't pause whatever the macOS audio subsystem is up to in the background (unfortunately), so that when you resume play, the audio subsystem says “Oy, real time clock was at Y but is now at Z, catch up”… and ffmpeg does what it's told. The only workaround would be to literally kill ffmpeg with a note of where it was up to and then resume with the ss starting switch. Clunky and I'm not up for coding that as yet… For now, the pause/resume buttons have been removed if macOS is detected as the operating system in use.
ImageMagick Issues
Installing ImageMagick in a Homebrew setting is an absolute nightmare (without which, Giocoso cannot show album art and instead shows error messages). The 'brew install imagemagick' fails on my Monterey macOS, because it tries to check for Unicode support, can't find the relevant library and thus gives up (the error is “ICU support no…”).
A very awkward workaround is possible:
brew install icu4c@78 pkg-config autoconf automake libtool
cd /tmp
curl -LO https://download.imagemagick.org/ImageMagick/download/ImageMagick.tar.gz
tar xzf ImageMagick.tar.gz
cd ImageMagick-*
./configure \
  --with-icu \
  CPPFLAGS="-I/usr/local/opt/icu4c@78/include" \
  LDFLAGS="-L/usr/local/opt/icu4c@78/lib"

make -j4
sudo make install
I mean, it works:

You can see the ghastly software compilation in the background, resulting in Giocoso in the foreground having no problem displaying album art… but it's a heck of a way to get to the desired destination!
An entirely different error stymies ImageMagick's installation on Catalina, too: this time, the problem will be that libzip can't be installed. The fix here is to issue these commands:
  cd
  cd Downloads
  wget https://imagemagick.org/archive/binaries/ImageMagick-x86_64-apple-darwin20.1.0.tar.gz
  tar -xzf ImageMagick-x86_64-apple-darwin20.1.0.tar.gz
  sudo mv ImageMagick-7.0.10 /usr/local/ImageMagick
Next:
  sudo nano /etc/paths
  At the top of the file, add a new line reading: /usr/local/ImageMagick/bin
  sudo cp -R /usr/local/ImageMagick/lib/* /usr/local/lib
  sudo cp -R /usr/local/ImageMagick/bin/* /usr/local/bin
Which is to say, download a quite old binary version of the program and manually copy it into places that the system will discover it exists.
Tweaks
Helios Screensaver: https://helios.macupdate.com/
Giocoso, Semplice and Niente all look fine in iTerm2 (or Wezterm). The problem with iTerm2, however, is that it 'remembers' each screen that any of those programs draws. You can therefore scroll back to see them at any time -which isn't terribly useful and rapidly becomes very annoying, given the ease with which it's possible to make accidental 'scroll up' commands by merely looking at your Magic Mouse! It's very easy to therefore end up with this sort of mess:
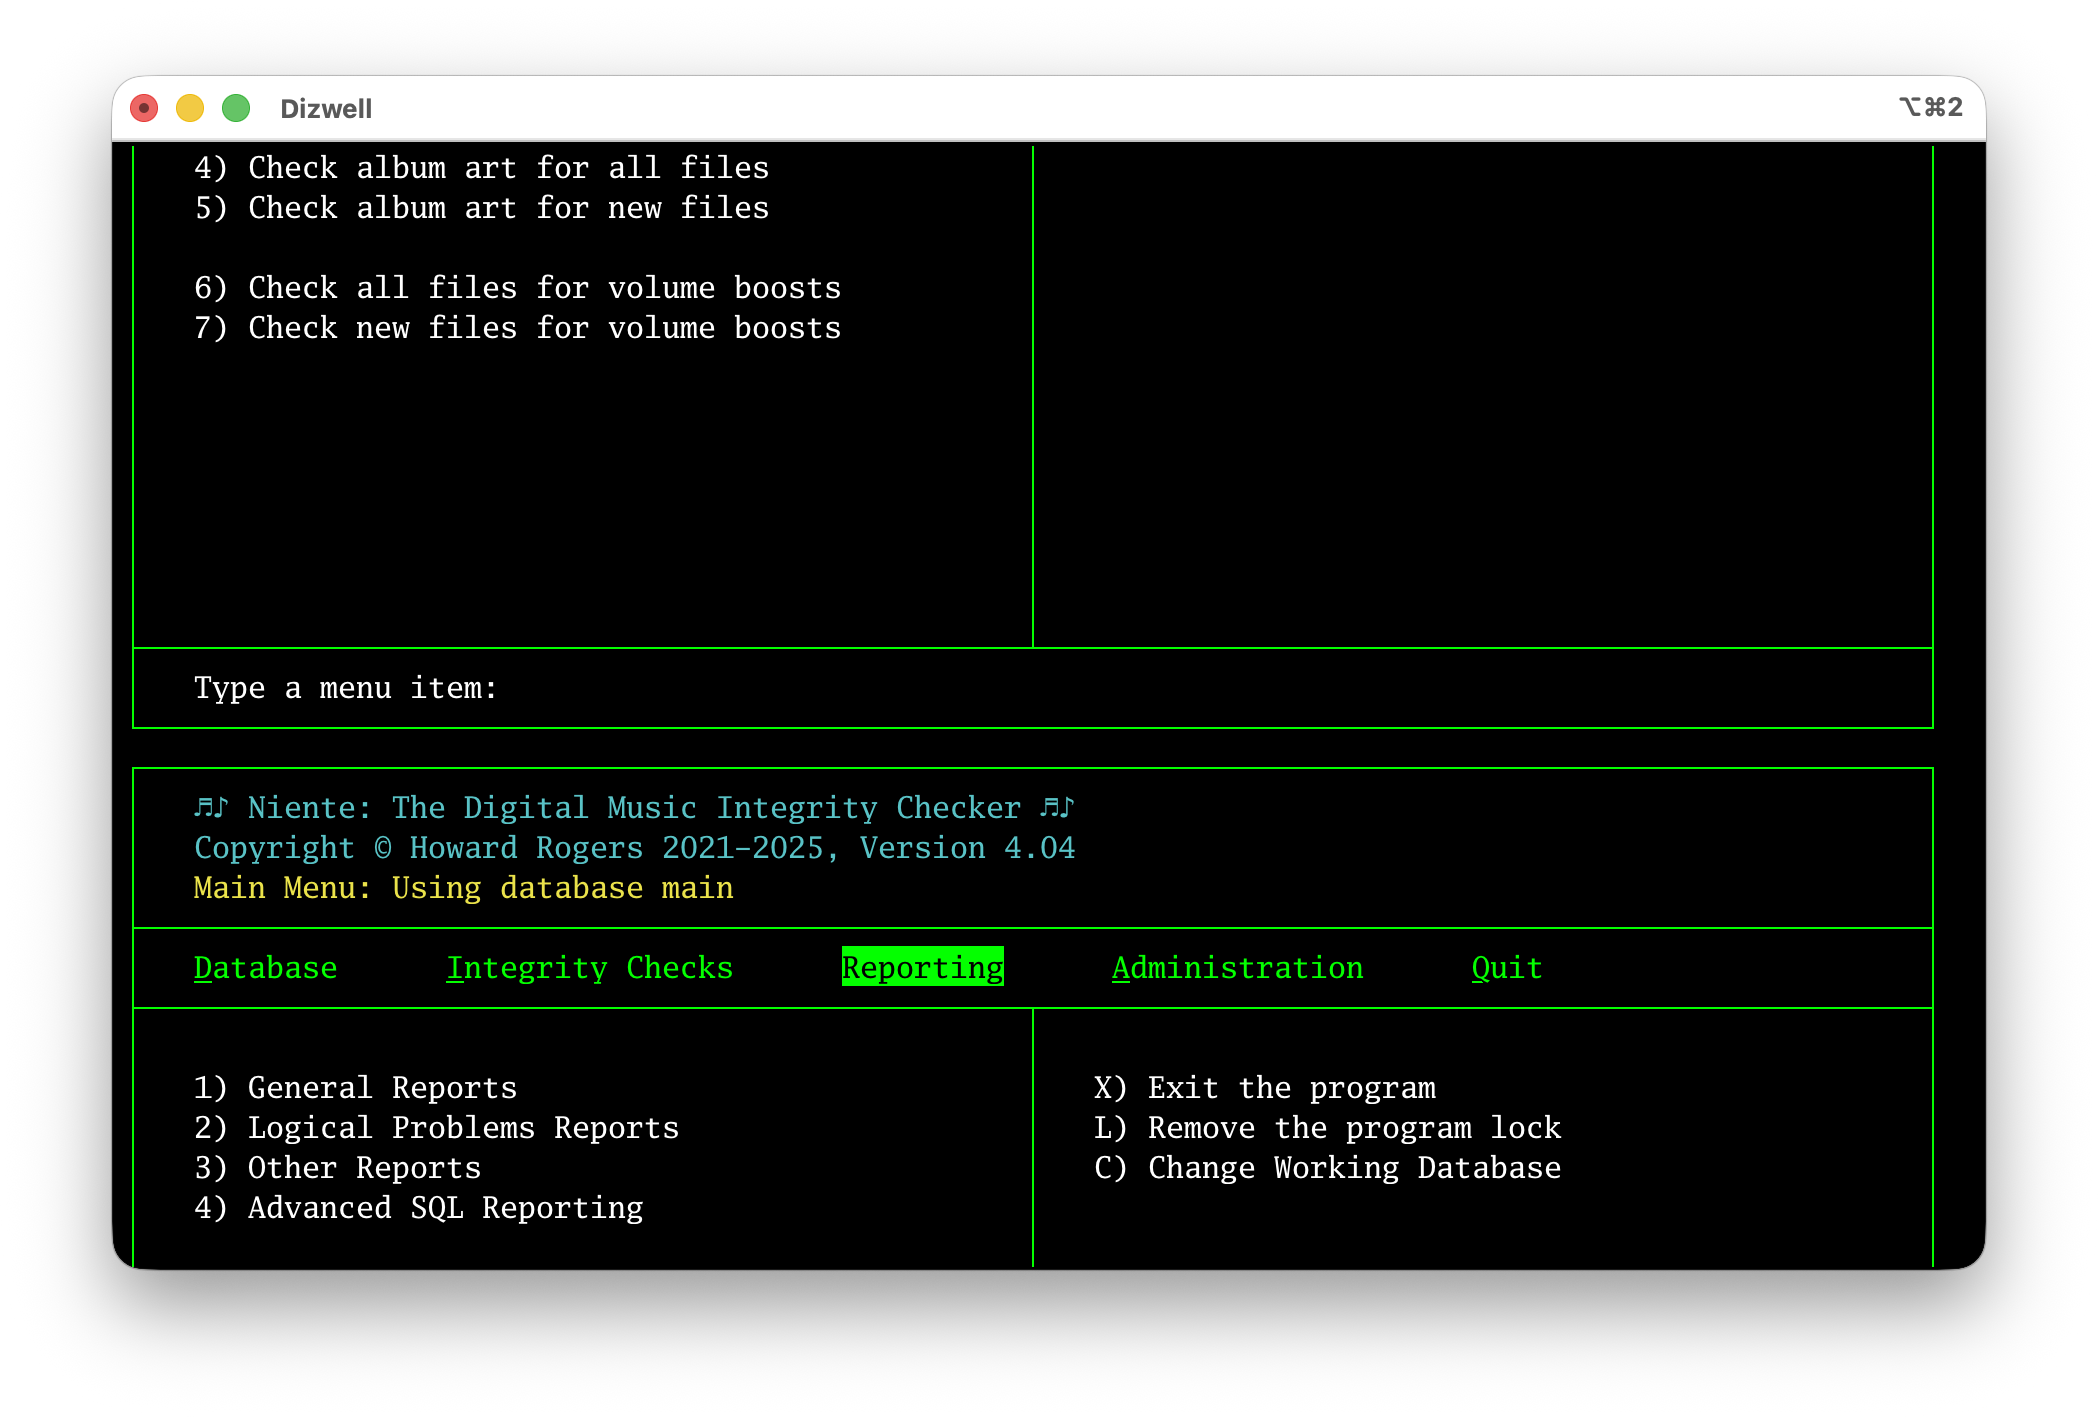
That's me sitting on the Reporting menu of Niente in the bottom part of the screen… but above it is a rendition of the screen when I was sitting on the Integrity Checks menu. Switching between menu items, in other words, creates an 'alternative screen' that is viewable if you scroll upward from the current screen. It is of no use to man or mouse (and WezTerm doesn't suffer from it!). Fortunately, it can be disabled in iTerm2:
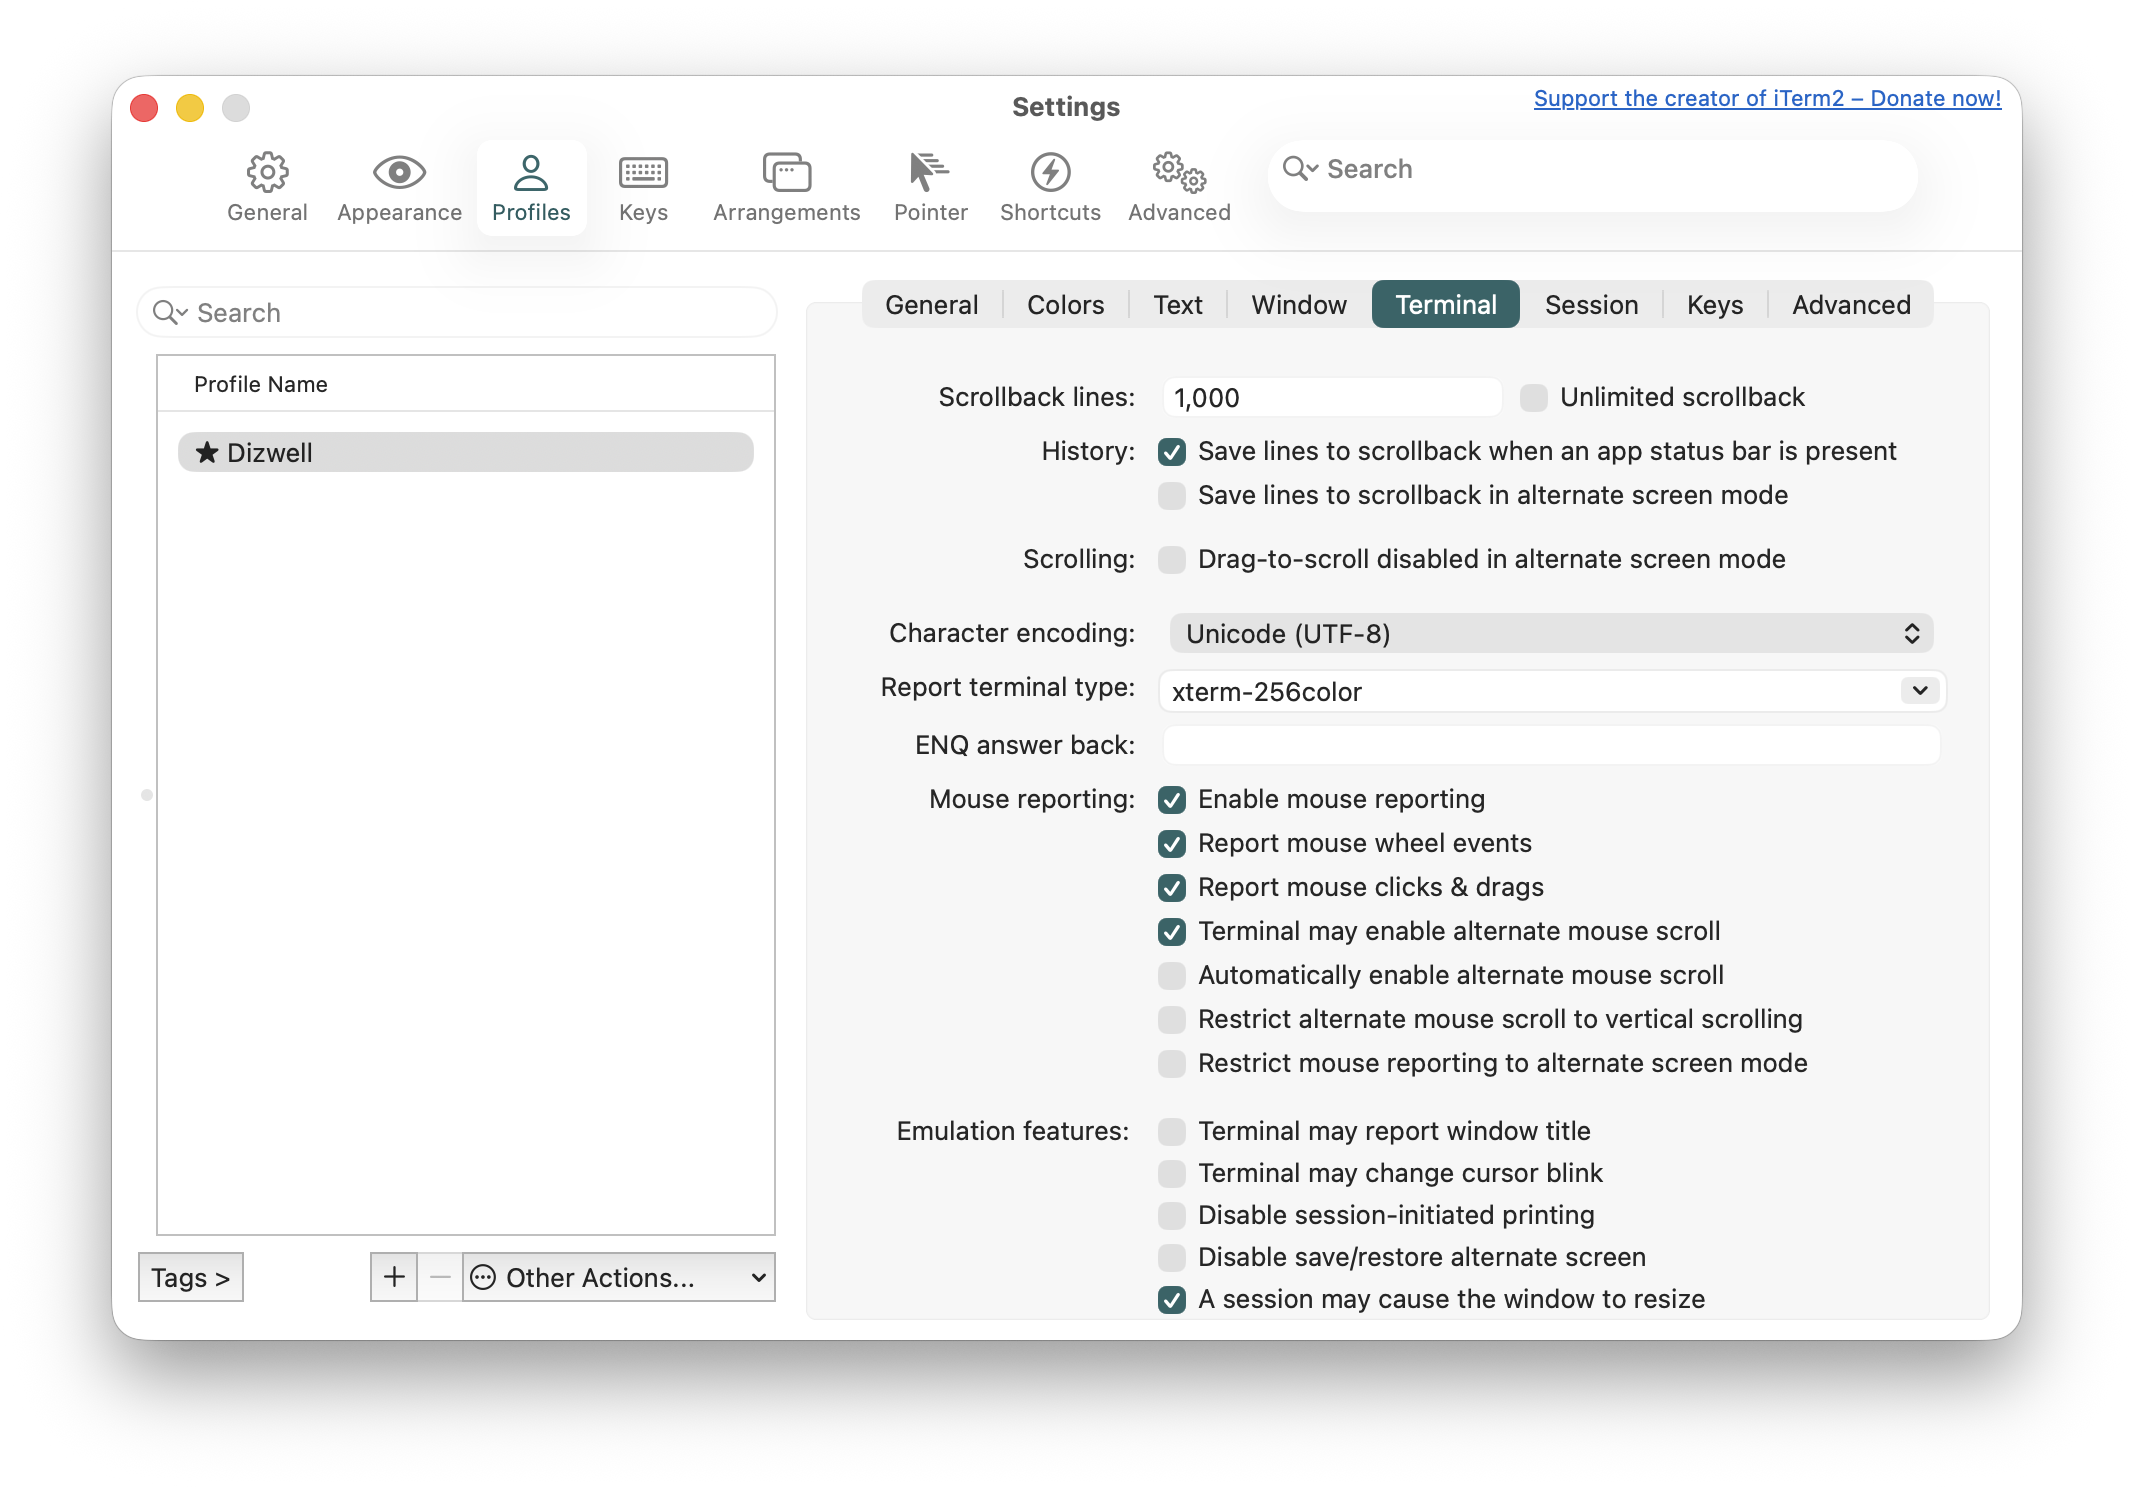
Disable the option to 'Save lines to scrollback in alternate screen mode' in the program Settings → Profiles → Terminal dialog. As well as making that change, however, you also need to add an alias for each affected program in your .zshrc file. For example, for Niente, you'd need this line:
alias niente='tput smcup; /usr/local/bin/niente4.sh; tput rmcup'
So, type the command cd to get to your $HOME folder, then nano .zshrc and add a line like that to the end of your existing file (or create a new file if no existing lines are present):
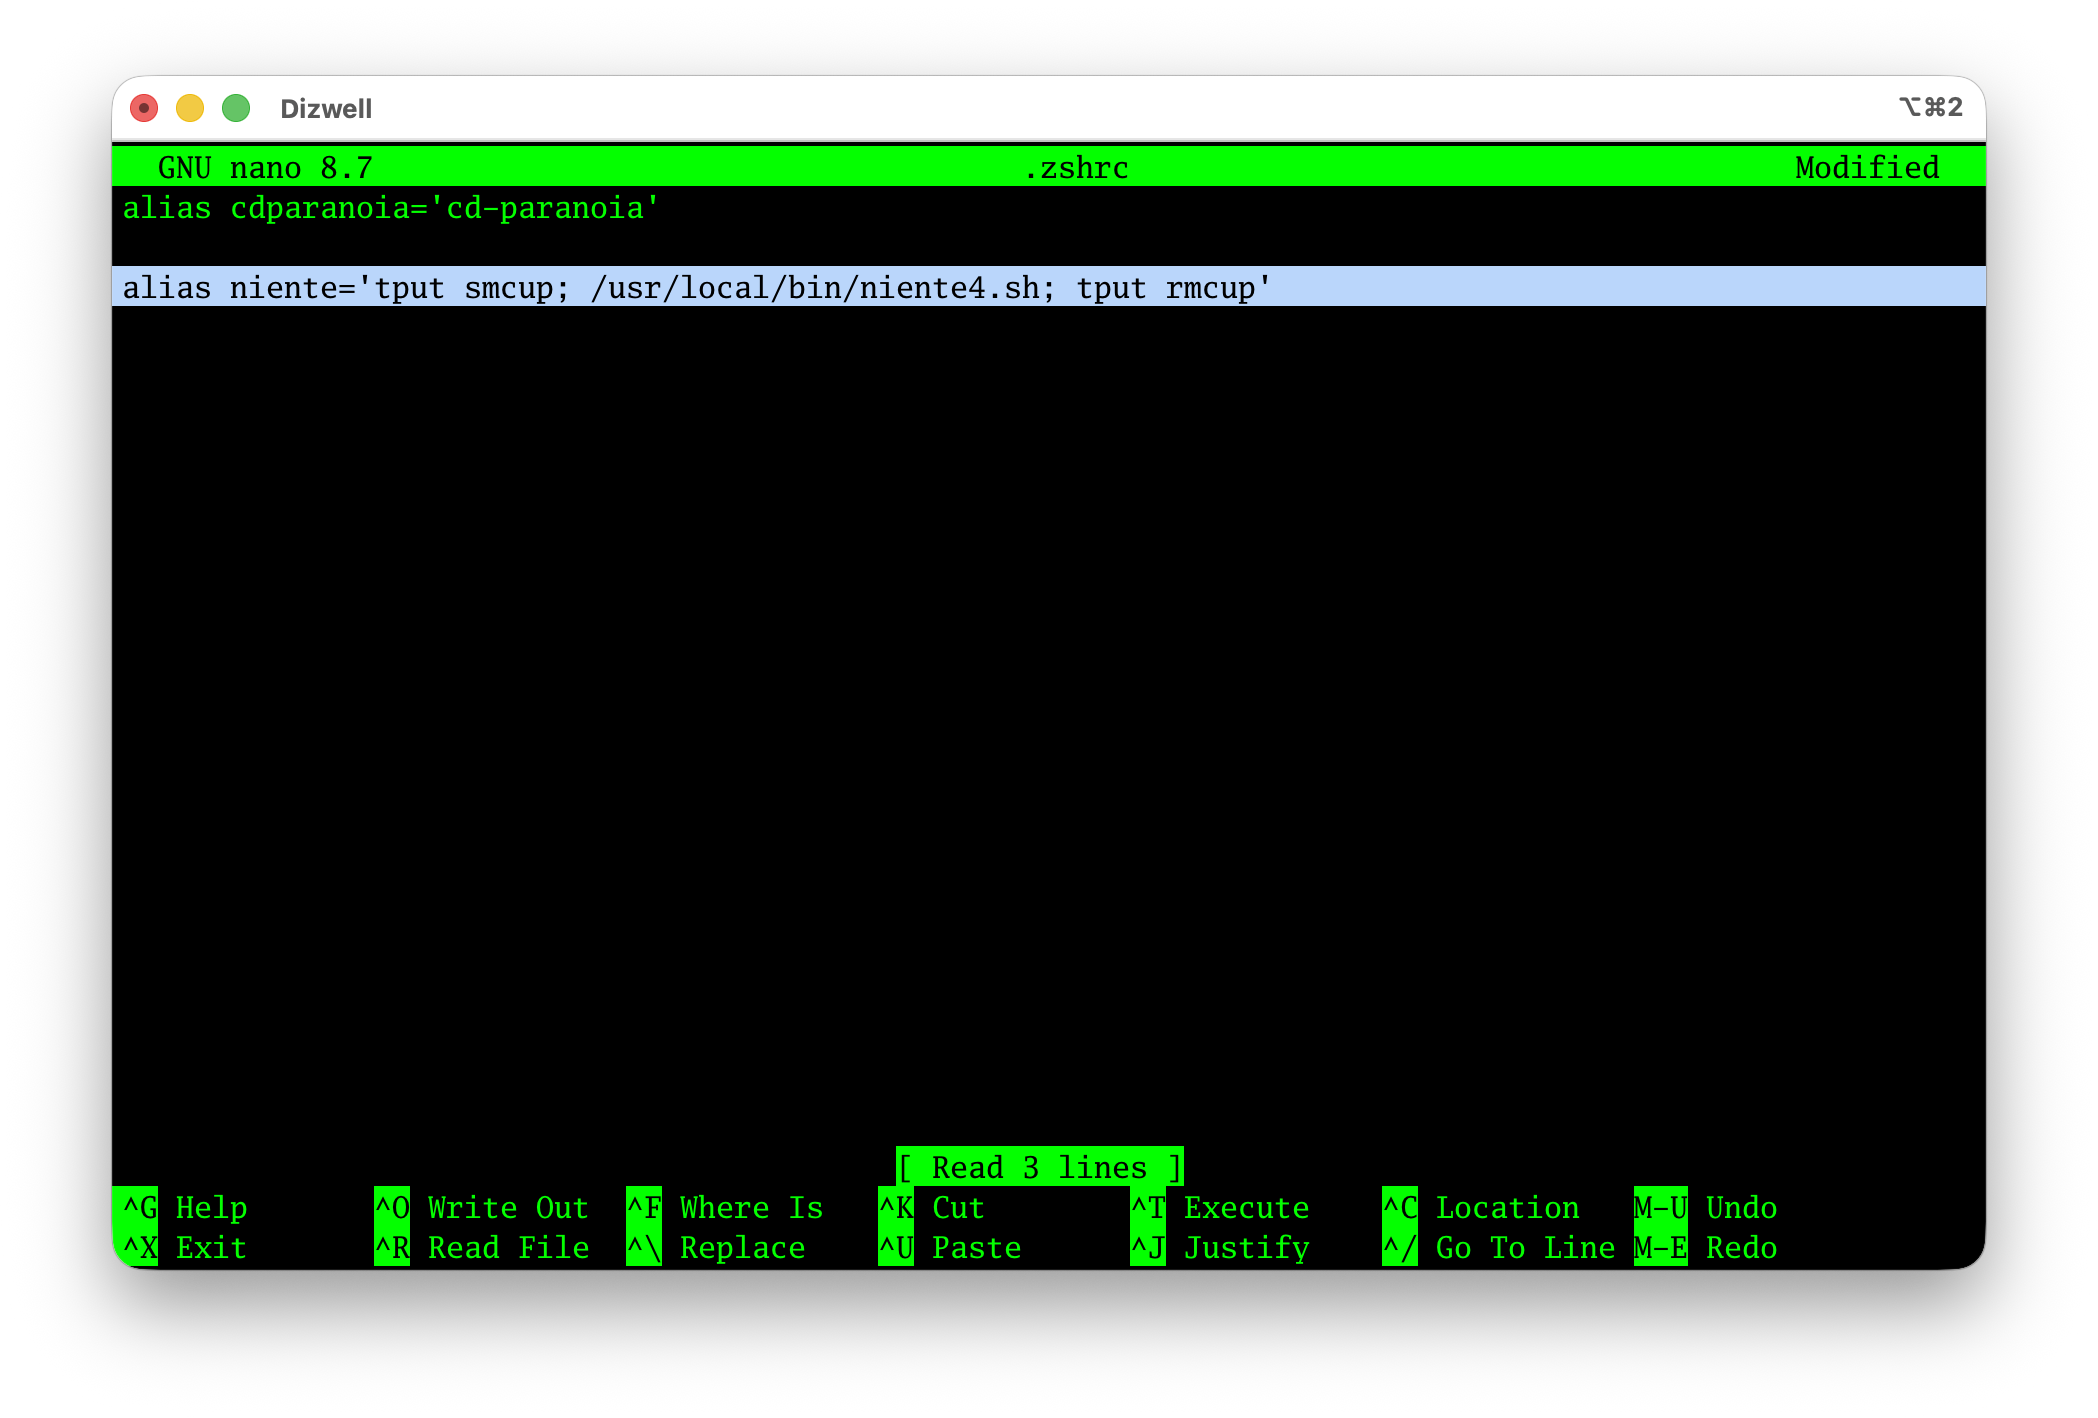
Save the modified file then close down your existing iTerm2 sessions and launch a new one: you'll find that Niente (in this example) no longer scrolls upwards: the screen you see is the one (and only one!) you get.
Replace “niente” and “/usr/local/bin/niente4.sh” with “giocoso” and “/usr/local/bin/giocoso3.sh” to achieve the same effect for Giocoso; use “semplice” and “/usr/local/bin/semplice2.sh” for Semplice.
As a general rule, Apple really locked security down tight from Mohave on, particularly in preventing terminal sessions from controlling other things on your system. That's a problem for programs like Giocoso and Niente, because they want to launch subsidiary terminal sessions to display reports, for example. The tightened security tends to want to stop them from doing that! Be prepared to visit System Preferences → Privacy & Security and grant full disk access to all your terminal emulators (or just the one you intend to use to run Giocoso et. al.) You'll also need to visit Automation and ensure that your various emulators are allowed to launch Terminal. All sorts of pop-ups (about accessing network shares, removable media or particular folders within your $HOME) will appear, too: make sure you grant the programs the permissions they need to work properly.
Shortcuts
Command + Shift + 4, then spacebar : Screenshot a particular window
Command + Shift + 4 : Screenshot a rectangular region
Command + Shift + 3 : Screenshot the whole screen
Command + H : Hide a window
Command + Q : Quit an application
Command + Tab : Cycle through open applications
Command + Shift + . (fullstop) : View hidden files/folders in Finder
Compose Key
OMG. This is much harder than it is in Linux! Well, not harder exactly, but a lot more fiddly to set up. Once it's set up, though, it works very much as it would on Linux, so there's that!
First: download and obtain a (free!) copy of Karabiner Elements, suitable for the version of macOS you're using, from here. The version on the big download button is only suitable for more recent macOS versions, so click the little down-arrow button to grab versions suitable for, say, Monterey or Catalina.
Once downloaded, do the usual “double-click to install” routine and step through the wizard.
Next, click here and copy the content of the weird-looking code in its entirety. It is an extremely long piece of code: over 4000 lines. Make sure you copy ALL of it, no exceptions.
Then in a terminal session, type:
cd
mkdir -p /Users/hjr/Library/KeyBindings (replace "hjr" with your own username, of course)
nano /Users/hjr/Library/KeyBindings/DefaultKeyBinding.dict
Paste into the new file the entire contents of the previously copied key binding code. Save.
The important thing to note about that code is how it starts:
{
    "\UF710" = {
        "\U0020" = {
            "\U0020" = ("insertText:", "\U00A0"); /* Compose, SPACE, SPACE: NO-BREAK SPACE */
            "\U0027" = ("insertText:", "\U0027"); /* Compose, SPACE, APOSTROPHE: APOSTROPHE */
That “\UF710” is the Unicode binding for F13. The file is basically saying, “When you see F13 pressed, do the following textual substitutions for whatever is typed next”… and then goes on to list something like 4000 possible substitutions to do! The trouble is that if your Apple Magic Keyboard is like mine, it won't have an F13 key. That, however, is where Karabiner Elements comes into effect: you run the program and create a new Simple Modification that maps the right-Command button to F13:

You're essentially saying “if I type right-command, interpret that as me pressing F13”. They keybinding file created earlier then kicks in and says, “F13 has just been pressed, what do I now do?” …and at that point, we're off to the races!
Be aware that Karabiner Elements will need all sorts of permissions to run effectively to provide this key remapping capability. In particular:
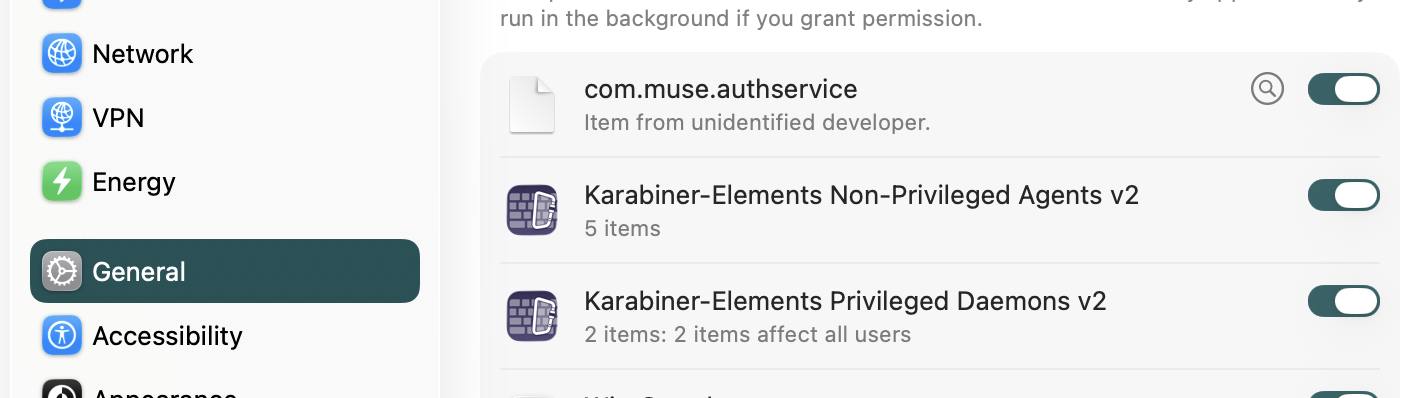
So, that's General → Login Items & Extensions: grant both parts of Karabiner those rights. Additionally:
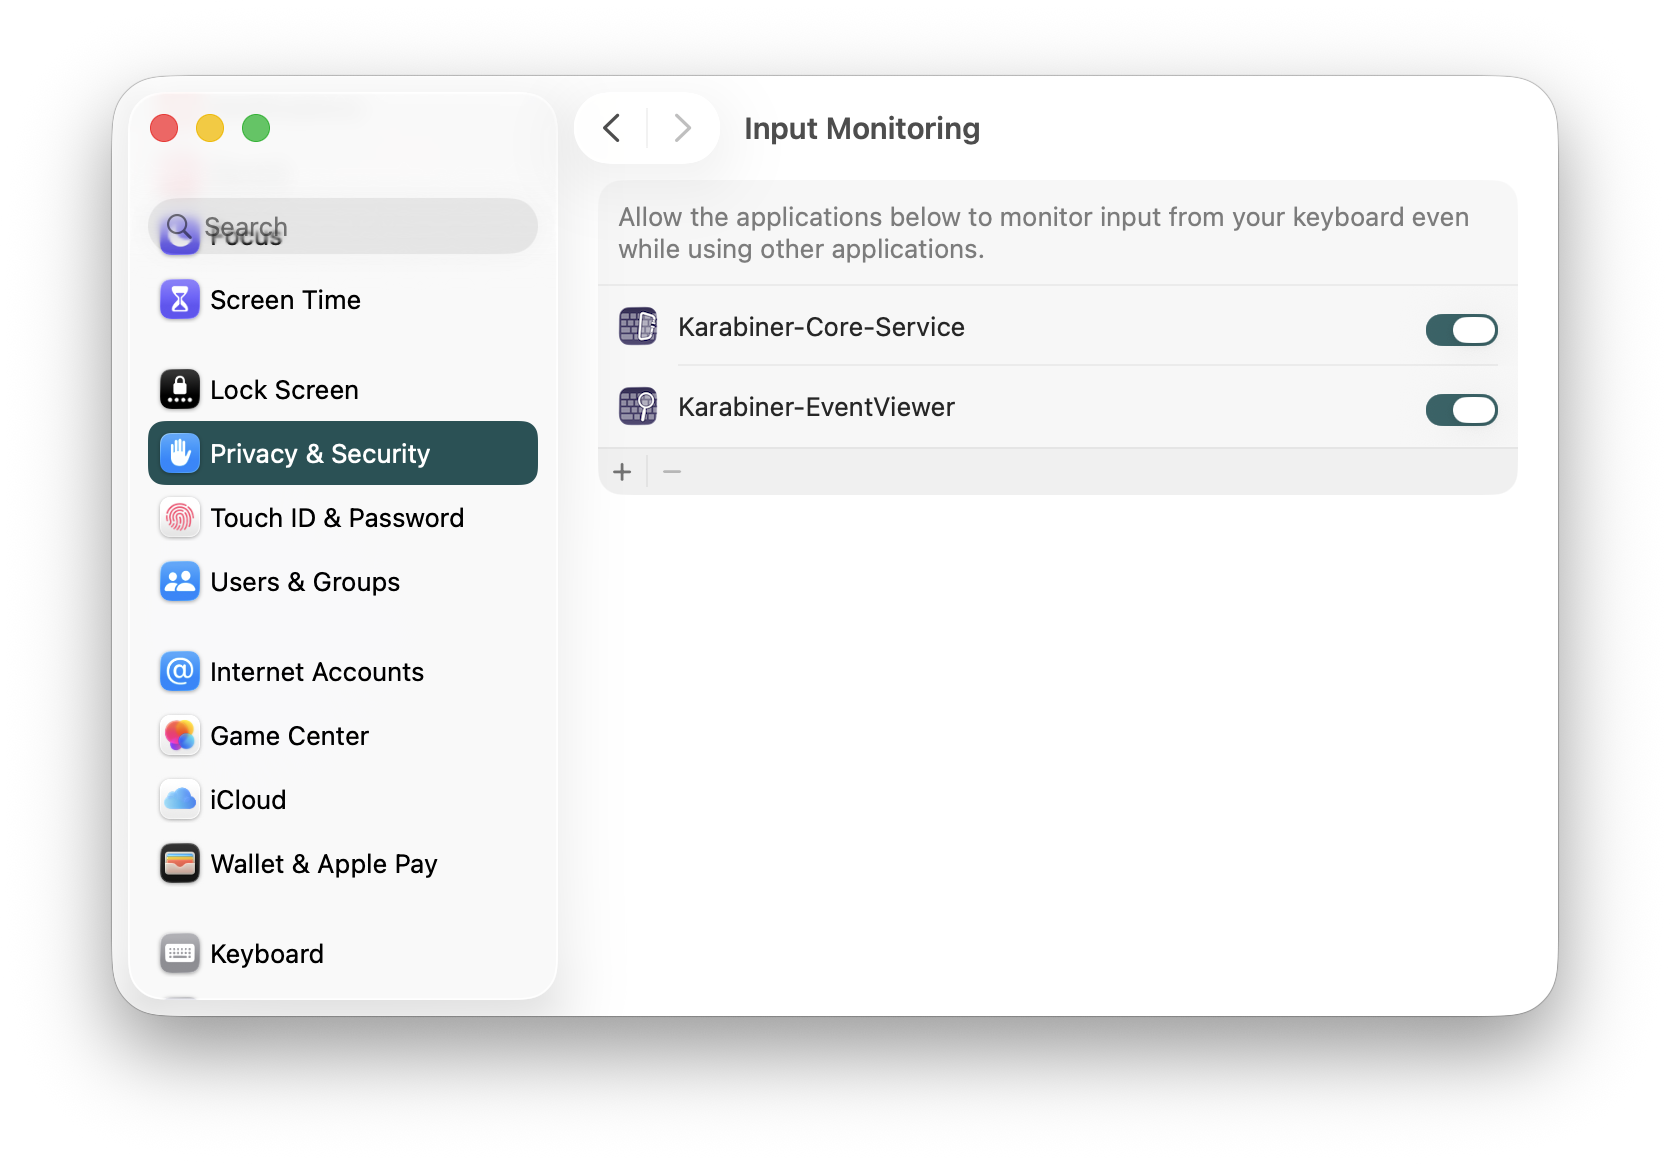
Both parts of Karabiner need to be granted the ability to do input monitoring. You may need to grant additional privileges as well, if Karabiner asks for them.
Now, close down your text editor if it's open (really close it down by quitting, don't just hide it), then re-open it from scratch and type Right-Cmd + ' + e and you'll see é; type Right-Cmd + = + e and you'll get €; type Right-Cmd + “ + u and you'll get ü… and so on. The point is: you have to re-launch programs that were already open at the time you installed Karabiner Elements in order to get the new keybindings picked up by applications. Once it's working, the Right-Cmd button essentially acts as the equivalent of the Linux “compose key” and all the usual key combinations apply.
SuperDrive Eject CD
On Apple Magic Keyboards version 2, there is a TouchID button where the old physical eject button used to be. So how do you eject a CD without a suitable button to press? Well, you could use Karabiner to re-define an existing key to act as though it were the old eject key. But it can also be done by adding an eject icon to the top-right of your permanent menu bar.
- Open Finder
- Press Command + Shift + G (or go to the Go menu and select Go to Folder)
- Navigate to: /System/Library/CoreServices/Menu Extras
- Find the file named Eject.menu and double-click it
The Eject icon (a chevron with a line under it) will instantly appear in your menu bar:

It's the third icon from the left!
Virtual Desktop Ordering
MacOS has an intensely annoying habit of deciding that your virtual desktops (what it calls 'spaces') should be re-ordered according to how recently you used them. Which is extremely aggravating if you're the kind of person that thinks to themselves “Office is on desktop 2 and Giocoso is on desktop 4”, for example.
Fortunately, this is only macOS's default behaviour and you can switch it off:
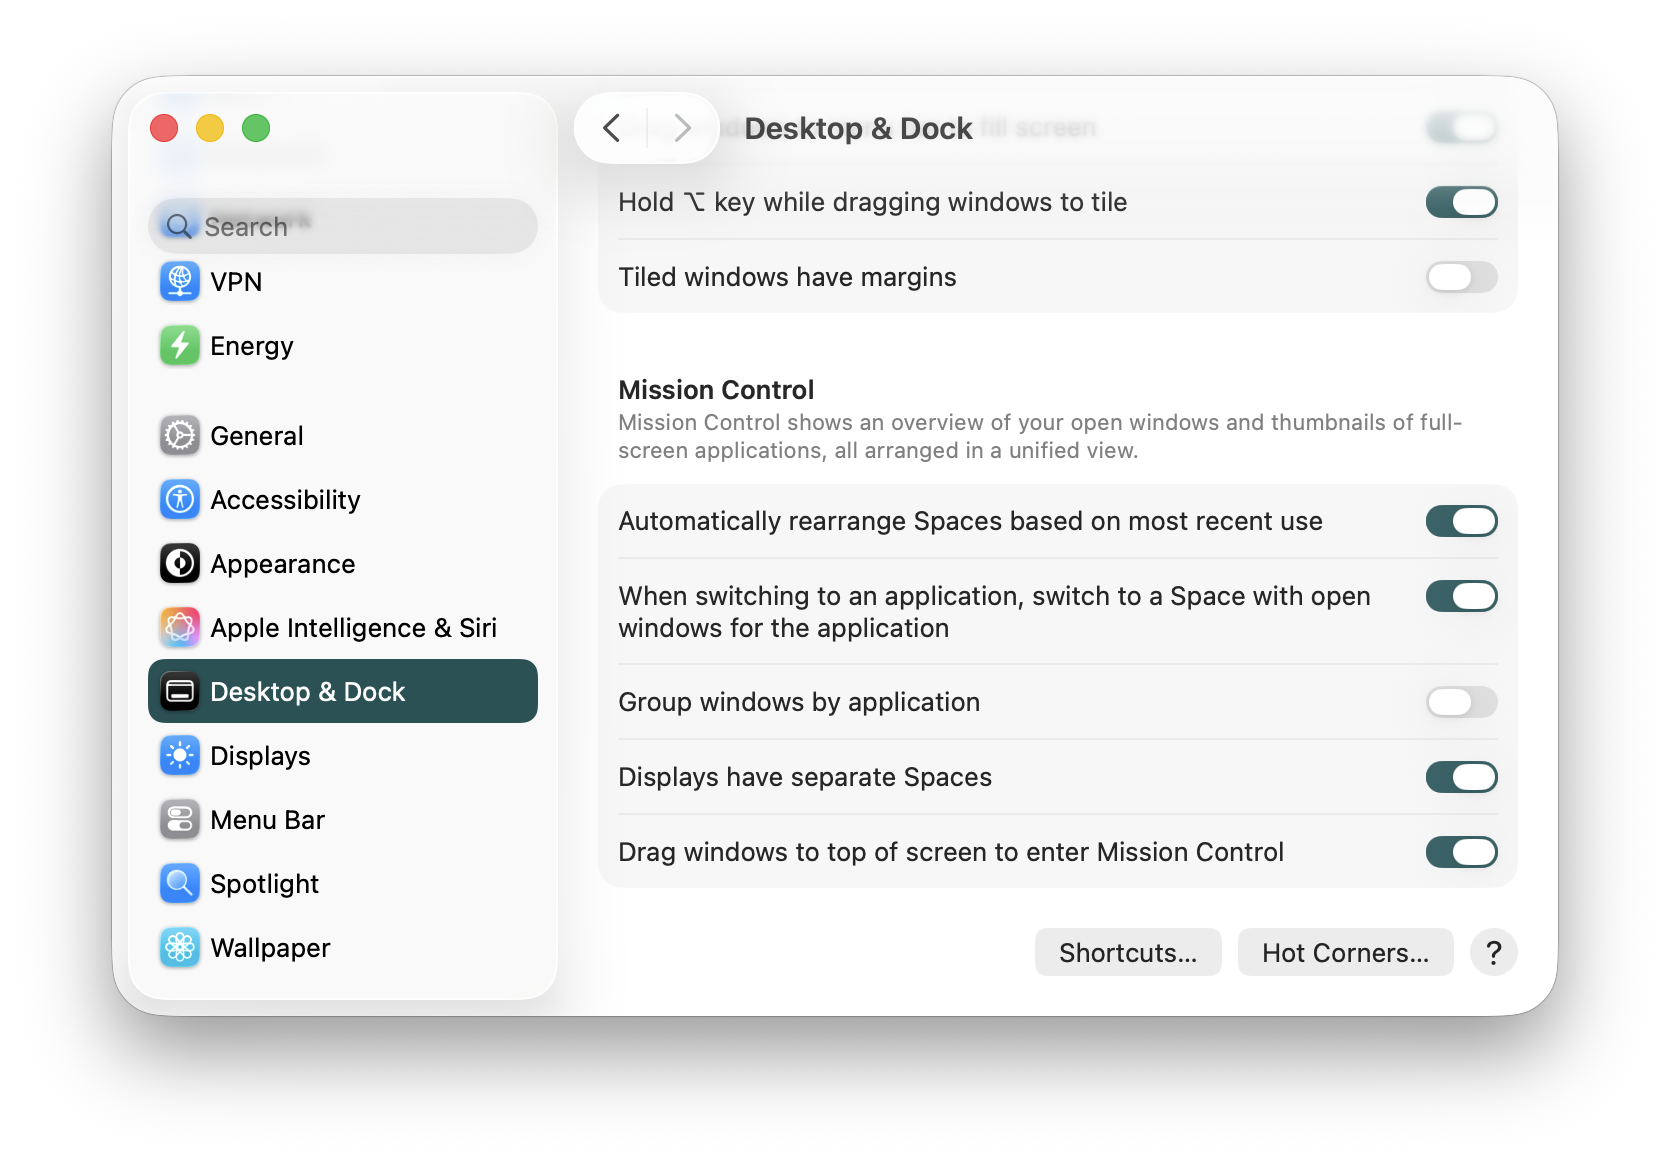
That's in System Settings → Desktop & Dock → Automatically rearrange Spaces based on most recent use. Turn that toggle switch off and your virtual desktops will remain in the order you thought they should be in!
Crontab and Niente in macOS
My crontab has this:
# Push Niente Statistics to the Webserver every 15 minutes
# ---------------------------------------------------------
14,29,44,59 * * * * /Users/hjr/Scripts/nientestats.sh

# Regularly re-scan for new recordings and perform analysis on
# anything thereby discovered
# ---------------------------------------------------------
12,27,42,57 * * * * /usr/sbin/diskutil info /Volumes/Music-Master >/dev/null 2>&1 && /usr/local/bin/niente4.sh --scan-new
13,28,43,58 * * * * /usr/sbin/diskutil info /Volumes/Music-Master >/dev/null 2>&1 && /usr/local/bin/niente4.sh --check-differential
So, four times an hour, I'm supposed to be scanning for new FLACs, analysing them when found and then pushing the results of an aggstats query to a text file for incorporation into this website. But it wasn't working. Why?
Well, it's something that even Linux users know: in a crontab, there's no PATH. So finding executables is tricky (which is why that full path to /usr/sbin/diskutil is mentioned twice!). The specific issue is that the niente4.sh shell script itself cannot have a PATH statement within it (it has to be able to run on Linux and macOS, so mentioning /homebrew in it isn't an option). The nientestats.sh shell script is one of my own devising, however, and can (and does!) have a PATH statement in it. So when those two niente4.sh jobs fired off, they fell on their faces, unable to find the ffmpeg and metaflac binaries they needed to run.
The fix for this is to add the following line to the top of the crontab:
PATH=/opt/homebrew/bin:/usr/local/bin:/usr/bin:/bin:/usr/sbin:/sbin
Now all jobs invoked by crontab pick up that PATH and are able to find metaflac and ffmpeg without drama. However, that then introduced another macOS weirdness: the first time the modified crontab was triggered, I saw a pop-up on my iMac warning that Bash wanted to access an external hard drive. This is part of Apple's security hardening process, sometimes called Transparency, Consent and Control or TCC for short. My music files are, indeed, stored on an external 4TB SSD drive plugged in via USB, so Niente (and thus Bash) would indeed need permission to access them. There is, unfortunately, no way to pre-authorise Bash for this: on my iMac, Bash already has 'full disk access' permission, but that doesn't extend to external hard drive access.
So, anyway: the first time my cron jobs triggered after adding the PATH statement to the top of my crontab, I manually clicked 'OK, grant access' to the pop-up: the two cron jobs then have fired routinely ever since. If you want this in words of few syllables:
- Your crontab must include a path
- You must be there for the first run of a job after a crontab is submitted
- Once you authorise, you're good to go thereafter
One final quirk: Niente generally expects to be run inside an interactive terminal, so being run by cron in a headless fashion is a bit of a struggle for it. Not that it breaks anything, but that expectation triggers a bunch of warnings when a niente job is run via cron. They're only visible if you explicitly pipe the errors out to a text file and they don't stop the job from working, but to completely silence them, I now also add the following to the top of my crontab:
TERM=dumb
That tells cron jobs not to expect to be able to output to an interactive terminal environment. I also modified Niente as follows:
function exit_program {
rm -f "$CONFDIR/txt/programvariables.txt" >/dev/null 2>&1;
if [[ -t 1 ]]; then
  tput cvvis
  tput sgr0
  clear
  reset
fi
exit 0
}
That ”-t“ test means “am I running in an interactive terminal environment or not?” If not, then it's pointless to use tput to move cursors around or set foreground colours or to reset a terminal: so all those things are inside the “if” statement. Cron jobs now, therefore, don't try to do any of those 'nice' things and instead just exits: that reduces the error output from a cron job to nothing.